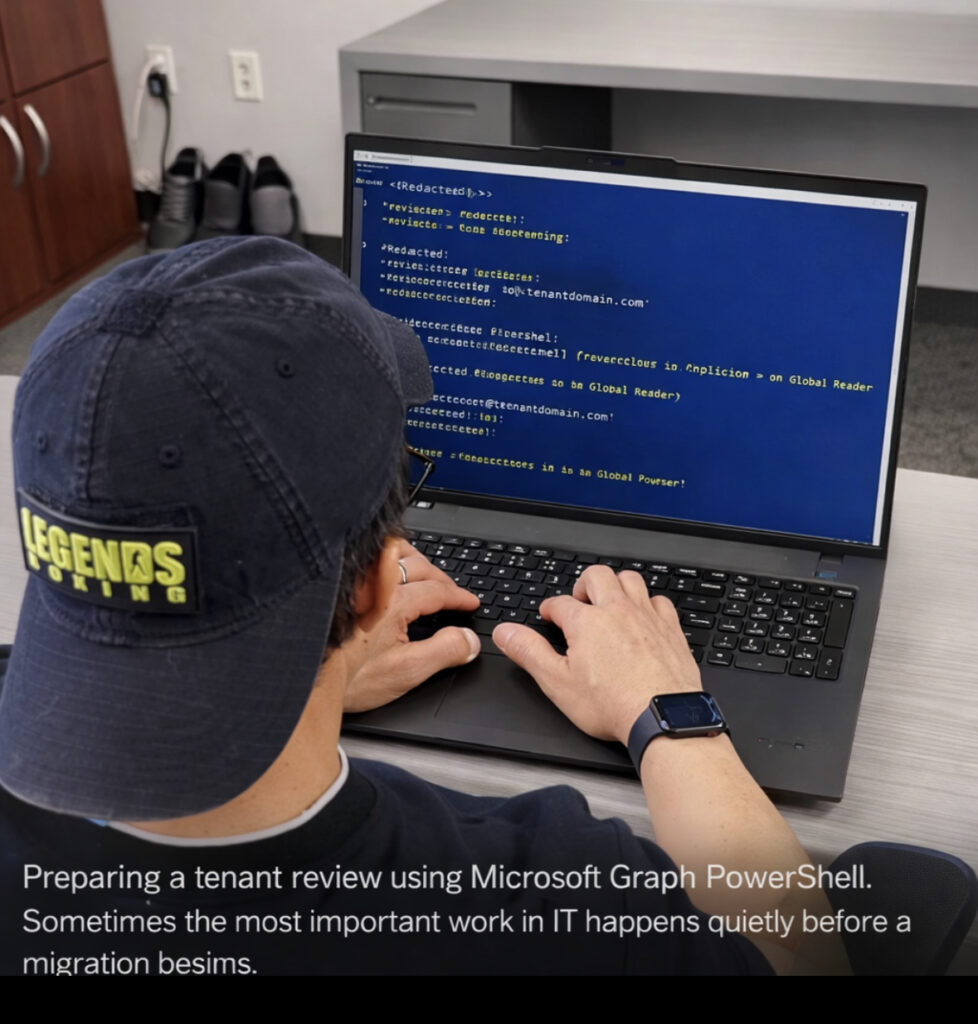
During Microsoft 365 tenant reviews or migration preparation, it is common to create a temporary read-only account so engineers can safely inspect the environment.
Instead of granting administrative permissions, the recommended approach is to assign the Global Reader role. This role provides visibility into configuration, policies, and identity structure while preventing any changes to production resources.
This method is frequently used during tenant consolidation, acquisitions, or domain transitions where a review of the existing environment is required before cutover.
The following PowerShell example demonstrates how to create a temporary user and assign the Global Reader role using Microsoft Graph PowerShell.
1. Create the Entra Account
Creates a temporary user account for tenant inspection.
Providing a temporary Global Reader account allows migration engineers to review the tenant safely. The role grants visibility into identity, security policies, and configuration without allowing any changes.
This approach reduces risk while ensuring the incoming team can properly analyze the environment before migration activities begin.
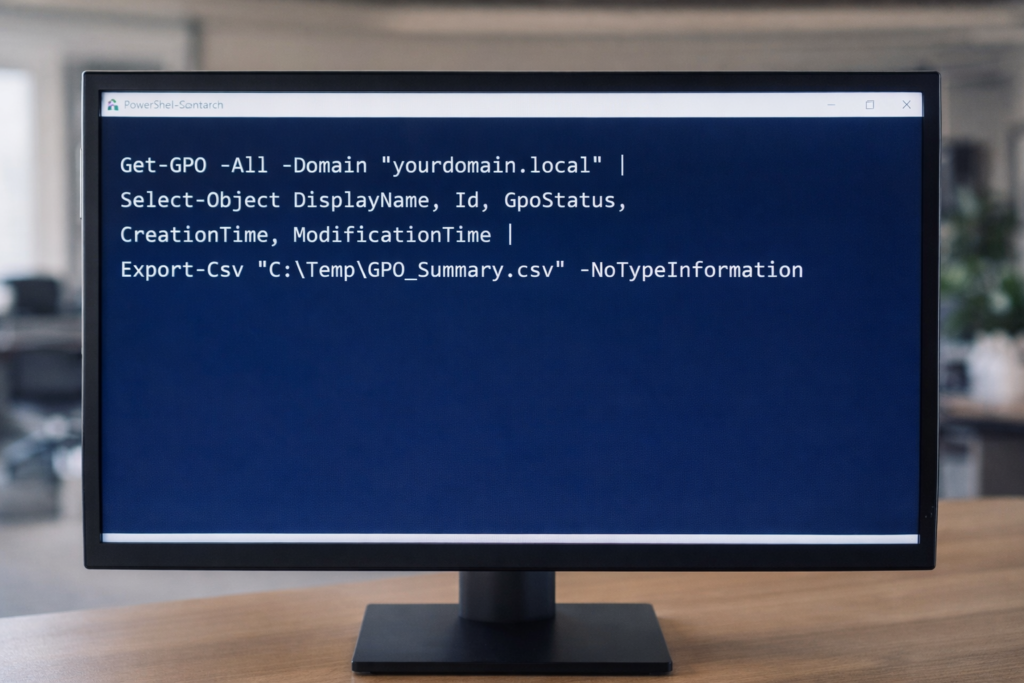
PowerShell export of Active Directory Group Policy Objects using native Get-GPO and Export-Csv commands to establish a baseline inventory before infrastructure changes.
Maintaining visibility into Group Policy Objects (GPOs) is critical before domain consolidation, tenant migration, or infrastructure modernization.
Below are seven native PowerShell commands used to generate a full GPO inventory, validate configurations, and export audit-ready reports.
All commands use built-in GroupPolicy modules — no third-party tools required.
1. Export GPO Summary Inventory
Exports high-level metadata for all GPOs in the domain.
Intro From the streets of the Philippines to enterprise systems in the United States, my IT journey has been shaped by work, faith, and persistence.
If you are starting from nothing, keep going — progress often begins long before anyone notices.
Early Grit
At twelve years old, I helped support my family by selling newspapers at midnight, shining shoes, washing dishes, and doing whatever work I could find. I didn’t know what IT was back then. I just knew how to work.
Early 1990s at All Electronics. Long days, multiple bus rides, and the first spark of curiosity about computers.
From Survival to Skill
When I immigrated to the U.S. in 1990, survival came first. I worked warehouse jobs, midnight shifts, and eventually landed a customer service role at All Electronics.
This photo was taken during that time.
From 6:30 in the morning until 3 in the afternoon, I answered calls nonstop — sometimes hundreds in a day. Getting to work meant taking multiple buses across the city. After my shift ended, I took another bus to my second job — either working the drive-through at Taco Bell or selling auto parts at O’Reilly in Reseda.
It was exhausting. But those years built my endurance.
That computer behind me was just part of my job then. I didn’t know it yet, but it would become the doorway to my future.
Later, I bought my own computer and started learning the only way I knew how — by breaking it and fixing it over and over again. Windows 3.0, autoexec.bat, and config.sys became my teachers. Night after night, I stayed with problems until they made sense.
Breakthrough
No one wanted to hire me without experience, so I created my own. I fixed computers for neighbors and small businesses for free. That’s how I learned.
In the early days of IT, skills were learned the hard way. There were no structured learning paths — just curiosity, manuals, broken machines, and persistence.
Eventually, USC took a chance on me — and I made sure I was ready. I supported hundreds of users, worked on migrations, and found my place in IT.
From USC, new doors opened quickly. I was recruited by GTE — now known as Verizon — and not long after, an aerospace company in Carson offered me a six-figure role. It was a moment that reminded me how far persistence can take you.
But in 2003, I made a decision that shaped the rest of my career. I left corporate America and built my own IT consulting company.
The City of West Covina became one of my first major clients — along with firefighters and the police department. USC later brought me back as a senior consultant. Opportunities followed: Microsoft projects, the Claremont Colleges, law firms, American Samoa, and Fortune 500 environments.
Over time, I expanded the business by hiring developers, engineers, and support staff — building not just systems, but people.
Back to Corporate America
The 2008 recession changed everything. It was a time when, as they say, big fish eat small fish. Consulting work slowed, and I knew it was time to pivot again.
My first step back into corporate America was Payforward, a startup company where I helped migrate infrastructure to Amazon Web Services during the early days of cloud adoption. Working in a startup environment sharpened my ability to move fast, solve problems with limited resources, and adapt quickly.
From there, I joined The Church of Jesus Christ of Latter-day Saints as a Support Email Engineer — a worldwide organization operating at global scale. It was there that my PowerShell scripting became more refined and reliable. We supported enterprise messaging systems while the organization expanded into Azure and AWS, strengthening both my automation skills and my understanding of cloud infrastructure.
After that, I moved into the financial sector at City National Bank. That environment introduced me to enterprise-grade infrastructure and security architecture — multiple datacenters, blade server systems, layered “brick-by-brick” firewall protection, application performance monitoring (APM), and the operational discipline required to keep banking systems secure and resilient. It was where infrastructure stopped being just systems and became architecture.
Later, I joined PIMCO (Pacific Investment Management Company), one of the most demanding global environments I had experienced. Technologies like Citrix VDI, AWS, Azure, and enterprise security platforms such as Duo, CyberArk, Arctic Wolf, Palo Alto, and SIEM monitoring were part of daily operations. Mailboxes could reach sizes close to 1 TB, and migrations happened across global regions — North America (NA), Europe, the Middle East, and Africa (EMEA), and Asia-Pacific (APAC).
Like Payforward, these environments required regular PCI-DSS and HITRUST audits. My PowerShell automation matured even further, and I learned how to operate inside highly regulated financial systems where security, compliance, and reliability were non-negotiable.
These experiences prepared me for the infrastructure work I continue to do today.
Where I Am Today
Today I work as an Infrastructure Engineer in Utah. I automate with PowerShell, document systems, support enterprise infrastructure, and mentor others who are starting their own IT journeys.
My work now includes provisioning ERP computers into Intune, managing VMware environments, and maintaining a Cisco Meraki network with a 10GB fiber backbone across MDM and multiple IDF locations. I also support Cisco UCS, Fibre Channel connectivity, Veeam backups, end-of-life transitions, Microsoft Defender, and Azure infrastructure.
Looking back, nothing about this path was easy. But every long bus ride, every second job, and every broken computer taught me something I still use today.
I didn’t fall into IT. I worked my way into it.
Everything I document today in my technical notes traces back to those early days of learning by doing.
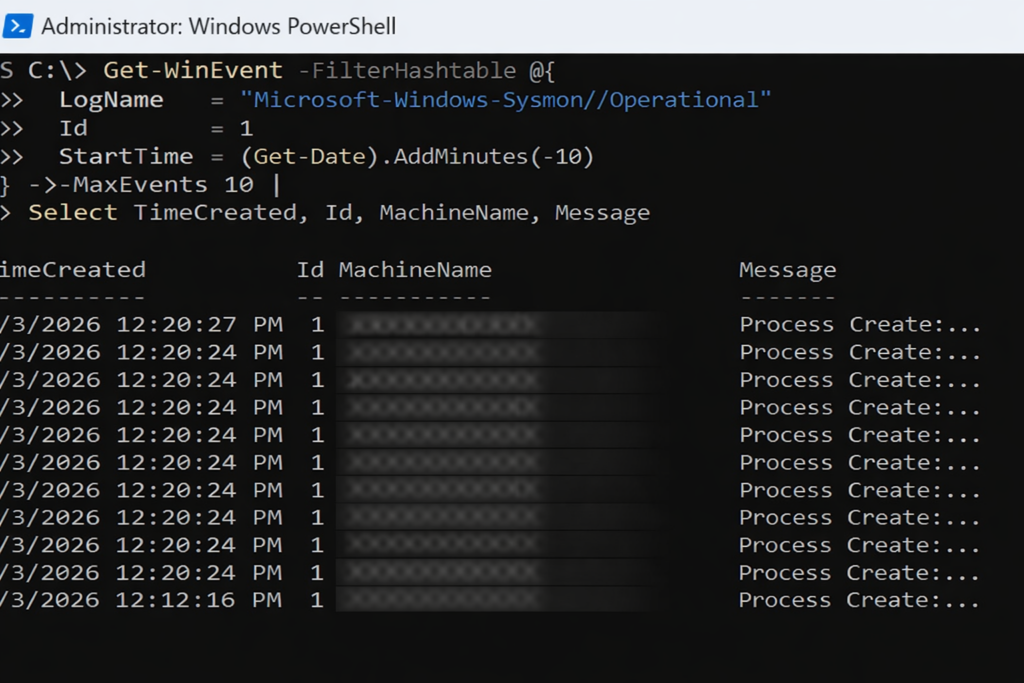
Sysmon Event ID 1 in action. Each entry records a process creation event, showing when a process started and providing the first layer of visibility into how activity begins on an endpoint.
Seeing What Actually Happens
Why this post exists
Sysmon is often misunderstood.
Some expect dashboards. Others expect alerts. A few expect it to magically explain incidents on its own.
Sysmon does none of those things.
What it does extremely well is something more fundamental. It records what actually happened.
Think of Sysmon as a black box flight recorder for a computer.
What Sysmon is
Sysmon (System Monitor) is a Windows system service from Microsoft Sysinternals.
Once installed, it continuously records detailed system activity into the Windows Event Log, including:
Process creation and command lines
Network connections
DLL and driver loading
Process access and injection behavior
Sysmon does not block activity. It does not alert. It observes and records.
What Sysmon is not
Sysmon is not:
A SIEM
A reporting platform
An inventory system
A centralized logging solution
Sysmon logs locally on each endpoint only.
Visibility comes later, when those logs are queried, collected, or forwarded.
Where Sysmon logs live
All Sysmon telemetry is written to the Windows Event Log on each machine.
Log path:
Microsoft-Windows-Sysmon/Operational
These logs can be:
Queried locally with PowerShell
Forwarded using Windows Event Forwarding
Collected by a SIEM
Reviewed during investigations
Why companies deploy Sysmon
Most security incidents are investigated after the fact.
Without Sysmon, questions like these are difficult to answer:
How did this process start?
What command launched it?
What network connection did it make?
Was this behavior normal for this system?
Sysmon provides the raw telemetry needed to answer those questions with evidence, not assumptions.
Where Sysmon comes from
Sysmon is part of Microsoft Sysinternals and is downloaded directly from Microsoft:
System Monitoring Made Simple for IT Admins & Security Pros
Sysmon (System Monitor) is part of Microsoft’s Sysinternals Suite, and it gives you deep visibility into process creation, network connections, file changes, and system activity. For threat detection, forensics, and baselining, Sysmon is one of the most powerful free tools you can deploy.
In this guide, I’ll walk through the step-by-step process of installing Sysmon cleanly on a Windows 11 machine, loading a hardened configuration, enabling the event log, and validating that everything is working.
This is the exact method I used on my laptop — clean, repeatable, and production-ready.
1. Prerequisites
Before you start:
Log in as a user with Local Administrator rights.
Open PowerShell as Administrator.
You’ll be using a mixture of PowerShell commands and Event Viewer, so make sure you have admin elevation.
2. Download Sysinternals Suite
Microsoft distributes Sysmon inside the Sysinternals Suite ZIP.
Download Sysinternals Suite from Microsoft’s official site.
Right-click Sysmon → Operational → Add to Favorites.
9. Updating the Sysmon Config Later
If you want to modify or replace the config:
cd C:\Sysinternals
.\Sysmon64.exe -c C:\Scripts\Sysmon\sysmonconfig.xml
You should see:
Configuration updated.
No reinstall required.
10. Uninstall Sysmon (if needed)
cd C:\Sysinternals
.\Sysmon64.exe -u force
This removes:
Sysmon64 service
SysmonDrv driver
Registry entries
Event manifest
Conclusion
Once installed, Sysmon becomes a powerful source of system telemetry for:
Threat hunting
Malware investigation
Lateral movement detection
Process monitoring
Incident response
Forensic analysis
With a hardened config, Sysmon gives deep visibility with minimal overhead — making it an essential component of any Windows security stack.
If you’re deploying Sysmon across multiple endpoints (like we do at work), you can automate it using Intune, GPO, or a custom PowerShell deployment package.
Whether it’s PowerShell, VMware, or supporting the team, I give my best because people depend on what happens behind this screen.
Introduction
Email is still the heart of business communication, and it’s also the easiest door for attackers to exploit. This is my real-world approach to securing Exchange Online: how I protect messages, enforce policies, retain critical data, and keep unwanted activity out of the environment. These are the tools I use every day — quiet, behind-the-scenes work that keeps an entire organization safe.
Messaging Policies and Mail Protection
What
Mail flow rules control how messages enter, exit, and move inside the company. They prevent risky behavior, secure sensitive data, and keep communication structured.
Why
Without strict policies, users can accidentally leak information, forward confidential data, or bypass compliance rules.
How
Mail Flow Rules I Maintain
• Prevent auto-forwarding outside the company • Block forwarding to personal Gmail/Yahoo • Restrict sensitive keywords (finance, HR, payroll) • Add disclaimers for external recipients • Enforce rules for shared mailboxes
This is my Exchange Online security toolkit — the messaging controls, retention systems, compliance protections, and routing safeguards I use every day. These tools protect users, leadership, legal teams, and the entire organization from silent risks that hide inside email traffic.
Real security isn’t loud. It’s consistent, careful, and invisible — until the moment it saves the business.
Terraform for M365 and Azure — Infrastructure-as-Code Made Simple
Introduction
Terraform is one of the most powerful tools for managing cloud environments because it lets you declare what you want and Azure builds it. No guessing. No clicking. No forgetting what you changed.
Even if M365 doesn’t support Terraform natively for all workloads, you can still automate Azure AD, Conditional Access, Groups, SPNs, Networking, Key Vault, and App Registrations through the Microsoft Graph provider.
I used IaC principles while supporting Church systems — Terraform makes environments repeatable, auditable, and consistent.
1. Installing Terraform
choco install terraform
2. Azure Login Block
provider "azurerm" {
  features {}
}

provider "azuread" {
}
A Technical History Through the Tools, Upgrades, and Real-World Administration That Shaped Modern Email
Email administration today looks nothing like it did in the mid-1990s. What began as a system of flat files and small IS databases has evolved into a globally distributed, cloud-secure service powered by modern authentication, forensic automation, and layered identity protections.
This article covers the full evolution — from Exchange 5.0 → 5.5 → 2000 → 2003 → 2007 → 2010 → 2013 → 2016 → Hybrid → Exchange Online — through the practical tools and real operational practices that defined each era.
It also highlights legacy repair tools (ISINTEG, ESEUTIL), the emergence of PowerShell, and modern security controls such as DKIM, DMARC, and real-time EXO policies.
1. Exchange 5.0 — The GroupWise Era & The Limits of Early Messaging
When Exchange 5.0 existed, Novell GroupWise was still considered the enterprise email standard. Capacity was limited and reliability required constant hands-on administration.
Key Characteristics
Basic directory service
Small private and public folder stores
No Active Directory yet
No PowerShell
16GB database ceiling
Frequent corruptions under heavy load
Real Tools Used
🔧 ISINTEG — Logical Database Repair
Example usage:
ISINTEG -pri -fix -test alltests
🔧 ESEUTIL — Physical Database Repair
Soft recovery:
ESEUTIL /r E00 /l "E:\logs" /d "E:\mdbdata"
Hard recovery:
ESEUTIL /p "E:\mdbdata\priv.edb"
Defrag/whitespace removal:
ESEUTIL /d "E:\mdbdata\priv.edb"
White space mattered because the database could never exceed the size limit, and defrags were essential to survive weekly growth.
2. Exchange 5.5 — The First True Enterprise Version
Exchange 5.5 replaced GroupWise in many organizations because it solved the two biggest weaknesses:
Major Improvements
Larger database limits
Internet Mail Connector (IMC) matured
Directory replication across sites
Better MAPI stability
More predictable backups
This was the version where large organizations first began to trust Exchange for hundreds or thousands of users.
Database limitations still required:
Regular whitespace removal
Offline defrags
ISINTEG repairs
3. Exchange 2000 / 2003 — Active Directory Arrives
The introduction of Active Directory changed everything.
Last-generation threats require immediate defensive controls. These are sanitized versions of the two emergency scripts used to block impersonation attacks:
🛑 Kill Switch Transport Rule (Blocks All External Sender Impersonation)
Microsoft Purview is Microsoft’s compliance, audit, and eDiscovery platform for Microsoft 365. It provides GUI-driven tools for administrators to perform searches, create holds, review data, and respond to legal and compliance requirements.
But here’s the reality that senior M365 engineers know:
Purview is powerful, but it is not complete. It has strict limits, throttles, and boundaries designed for safety and performance — not deep forensic analysis.
This is why serious investigations always end up in PowerShell, where engineers can bypass GUI limitations, perform deeper searches, and collect evidence with precision.
Section 1 — What Purview Is (in plain English)
Purview provides:
Content search
eDiscovery (Standard & Premium)
Litigation holds
Audit logs
Labeling and retention
Insider risk scanning
Communication compliance
It is designed for:
Legal teams
Compliance officers
HR investigations
Corporate governance
High-level reporting
And for these purposes, Purview works very well.
Section 2 — The Hidden Limitations of Purview
Here are the real limits engineers face:
1. Sending & Rate Limits
Purview actions follow the same throttling limits as Exchange Online. You cannot pull unlimited messages instantly.
2. eDiscovery Query Limits
Each Purview search query is limited to: 10,000 characters This is a major limitation for complex filters.
3. Maximum Export Sizes
Large exports (multiple gigabytes) often fail or time out. This is why forensic engineers break searches into chunks.
4. Maximum Holds Per Mailbox
A mailbox can only have: 25 holds total More than 25 affects performance, indexing, and mailbox health.
Indexing dependency (if an item isn’t indexed, Purview can’t see it)
7. Purview is not real-time
It depends on indexing engines. Indexing delays = missing results.
8. Purview cannot reveal everything
For true forensics you often need:
Message trace logs
Transport logs
Historical mailbox snapshots
DeletedItems and RecoverableItems subfolders
Soft delete and hard delete content
Hidden folders
Unindexed items
Purview cannot provide all of that.
Section 3 — Why PowerShell is Superior for True Forensics
When Microsoft engineers or financial institutions perform real investigations, they do not rely on Purview alone. They rely on PowerShell because PowerShell can do what Purview cannot.
1. Access Every Folder (Including Hidden Ones)
PowerShell can query:
Inbox
Sent
DeletedItems
RecoverableItems
Purges
Versions
Subfolders not visible in Outlook
Unindexed items
Purview can’t.
2. No GUI query limit
There is no 10,000-character query restriction in PowerShell.
Pattern searches can be huge, detailed, and layered.
3. Deep Header and Message Metadata Extraction
PowerShell can extract:
X-MS-Exchange-Organization-AuthAs
X-MS-Exchange-CrossTenant-*
Original client IP
Authentication results
Message submission type
Connector source
Spam confidence level (SCL)
Envelope sender
Message ID tracking
Purview provides only summarized metadata.
4. Instant, Real-Time Search
PowerShell does not wait for indexing. You can search unindexed items directly.
This is critical in security incidents.
5. Mailbox Timeline Reconstruction
With PowerShell you can reconstruct:
When the message was received
When it was moved
If rules redirected it
If a compromised mailbox forwarded it
If the user deleted it
If it was purged
Purview cannot reconstruct movement history.
6. PowerShell is scripting + automation
You can automate:
Large case collections
Exports
Multi-mailbox searches
Pattern scans
Complex filters
Timeline reconstruction
Purview cannot automate eDiscovery at the same level.
Section 4 — When to Use Purview vs PowerShell
Use Purview for:
Legal holds
HR requests
Basic content searches
Governance
Compliance reporting
Policy enforcement
Use PowerShell for:
Security incidents
Ransomware investigations
BEC (Business Email Compromise)
External spoofing investigations
Compromised mailbox analysis
Hidden folder discovery
Deep metadata extraction
Multi-mailbox timeline reconstruction
Most senior email engineers agree:
Purview is the “legal view.” PowerShell is the “truth view.”
Conclusion
Purview is an essential tool for compliance and legal workflows — but it is not a forensic engine. Its GUI limits, throttles, and reliance on indexing mean that it can never replace the precision, speed, and depth of PowerShell.
This is why real investigations — especially in financial institutions and regulated organizations — always rely on PowerShell for final answers.
In modern cloud environments, threats don’t wait for meetings, approvals, or planning sessions. Sometimes an attack hits so fast that your only advantage is instinct, experience, and the ability to act immediately.
Last month, I experienced exactly that — a coordinated impersonation attempt from multiple bad actors in Europe using public cloud hosting (GCP) as their relay. They created their own connectors and attempted to impersonate internal executives and accounting contacts.
The attack bypassed standard controls because:
They used legitimate cloud IP ranges
They generated perfect SPF/DKIM passes
Their mail flow looked “clean” until you read the headers
They used crafted envelope senders + forged display names
The only way to stop them instantly — before users were tricked — was to drop two transport rules at highest priority using PowerShell. These acted as “circuit breakers” until perimeter firewall rules could be deployed.
Below is the exact PowerShell approach, redacted and rewritten for general use.
🚨 Reflex Script #1 — Emergency “Kill Switch” Rule
Purpose: If attackers are impersonating an internal address like [email protected], this rule blocks any external sender who uses that address in the envelope from or header from.
From Customer Service Rep to PC Specialist, Network Engineer, System Administrator, DevSecOps, and now Infrastructure Engineer — a journey built on faith, discipline, dedication, and gratitude.
Introduction: The Path Is the Practice
My story didn’t begin with servers or certifications. It began at All Electronics Corporation in Van Nuys, California, where I worked full-time from 6:30 A.M. to 3:00 P.M., taking two Metro buses and walking a block from the station — rain or shine — from December 1990 to late 1995.
I woke as early as 4 A.M. to catch the first bus at Western and 3rd Street in Los Angeles, sometimes heading straight to my evening shift at the Taco Bell drive-thru in Glendale. Those were humble, exhausting days that taught me discipline and grit — lessons that would shape every part of my career.
At All Electronics, I became fascinated by the IC — Integrated Circuit, the heart of every desktop computer. I wanted to understand it, not just sell it.
Back in my Koreatown apartment, I turned curiosity into calling. No Google. No YouTube. No AI. Just library books and endless nights of self-study. I intentionally crashed my computers and rebuilt them until every fix became muscle memory.
Once confident, I started offering free repairs and computer lessons to friends, relatives, and senior citizens — setting up printers, fixing networks, and teaching email basics. Those acts of service opened the door to my first full-time IT job at the University of Southern California (USC) as a PC Specialist.
I still remember waiting at the bus stop in the dark, dreaming of the day I wouldn’t have to ride in the rain. Years later, those same dreams became reality — not through luck, but through faith, discipline, dedication, and gratitude. The rides changed — from buses to a BMW, an Audi, and now a Tesla — but what never changed was the purpose: to keep moving forward while staying grounded in gratitude.
Season of Refinement
While working full-time at USC, I entered what I call my season of refinement. By day I supported campus systems and users; by night I was a full-time student at Los Angeles City College (LACC) and a weekend warrior at DeVry University, studying Management in Telecommunications.
It was during this time that Microsoft introduced the MCSE (Microsoft Certified Systems Engineer) program. One of my professors at LACC encouraged me to earn it, saying, “Once you have that license, companies will chase you.” He was right — that MCSE became my ticket to GTE (now Verizon), my first step into enterprise-scale IT.
My tenure at GTE was brief because Aerospace came calling with a six-figure offer just before Y2K — an opportunity too good to refuse. After Aerospace, I founded my own consulting firm — Ahead InfoTech (AIT) — and entered what I now call my twelve years of plenty.
One of my earliest major clients, USC Perinatal Group, asked me to design and implement a secure LAN/WAN connecting satellite offices across major hospitals including California Hospital Medical Center, Saint Joseph of Burbank and Mission Hills, and Hollywood Presbyterian Hospital. We used T1 lines with CSU/DSU units and Fortinet firewalls; I supplied every workstation and server under my own AIT brand.
Through that success I was referred to additional projects for Tarzana and San Gabriel Perinatal Groups, linked by dedicated frame-relay circuits — early-era networking at its finest. Momentum led to new partnerships with The Claremont Colleges and the City of West Covina, where I served as Senior Consultant handling forensic analysis and SMTP/email engineering.
Word spread. One attorney client introduced me to an opportunity in American Samoa to help design and build a regional ISP, and later to a contract with Sanyo Philippines. During this period Fortinet was still new, and I became one of its early resellers. Refusing to rely on mass-produced systems, I built AIT servers and workstations from the ground up for every environment. DSL was just emerging, yet most clients still relied on dedicated T1s — real hands-on networking that demanded precision and patience.
Those were the twelve years of plenty — projects that stretched from local hospitals to overseas data links, from LAN cables to international circuits. By the time AWS arrived in 2006 and Azure followed in 2010, I had already been building and managing distributed networks for years.
When I returned to Corporate America, my first full-time role was at Payforward, where I led the On-Prem to AWS migration, designing multi-region environments across US-East (1a and 1b) and US-West, complete with VPCs, subnets, IAM policies, and full cloud security. That’s when I earned my AWS certifications, completing a journey that had begun with physical servers and matured in the cloud.
Education, experience, and certification merged into one lesson: Discipline comes first. Validation follows. Degrees and credentials were never my starting line — they were the icing on the cake of years of practice, service, and faith.
My Philosophy: One Discipline, Many Forms
Whether in Martial Arts, IT, or Photography, mastery comes from repetition, humility, and curiosity. As Ansel Adams wrote:
“When words become unclear, I shall focus with photographs. When images become inadequate, I shall be content with silence.”
Everyone can take a photo; not everyone captures a masterpiece. Everyone can study tech; not everyone understands its rhythm. Excellence lives in awareness — the moment when curiosity meets purpose.
The Infrastructure Engineer Path
1️⃣ Foundations
Learn the essentials: Windows Server, Active Directory, DNS/DHCP, GPOs, Networking (VLANs, VPNs), Linux basics, and PowerShell. Free Resources:
Document every lab, build diagrams, post scripts on GitHub, and write short lessons learned.
Final Reflection
From bus stops to boardrooms, from fixing desktops to deploying clouds — the principles never changed: serve first, learn always, and build things that last. This blog will continue to evolve as technology changes — come back often and grow with it.
🪶 Closing Note
I share this story not to boast, but to inspire those still discovering their own path in technology. Everything here is told from personal experience and memory; if a date or detail differs from official records, it’s unintentional. I’m grateful for mentors like my LACC professor, who once told me to look up a name not yet famous — Bill Gates — and earn my MCSE + I. He was right: that single decision opened countless doors.
I don’t claim to know everything; I simply kept learning, serving, and sharing. My living witnesses are my son, my younger brother, and friends who once worked with me and now thrive in IT. After all these years, I’m still standing — doing what I love most: helping people through Information Technology.
⚖️ Legal Disclaimer
All events and company names mentioned are described from personal recollection for educational and inspirational purposes only. Any factual inaccuracies are unintentional. Opinions expressed are my own and do not represent any past or current employer.
Needed a quick “where did this user sign in from?” report without swapping modules. I used AzureADPreview to export a clean CSV (timestamp, IP, country/state/city, app, client, result). All identifiers below are redacted; mailbox shown as [email protected].
Intro
Security asked for a last-30-days sign-in report. I didn’t want to migrate the host that already had AzureADPreview, so I stayed on that and exported the fields they care about. Notes are redacted and portable.
Notes from {Speaker}
Context: Windows PowerShell 5.x (STA) + AzureADPreview.
Avoided Microsoft Graph SDK on this box.
Output: CSV with location + app/client details.
Perspective (direct quotes)
“Use Windows PowerShell (not PS7) so the AzureAD auth control behaves.” “If you change the date range, re-run the query—don’t reuse the old $logs.”
Practice (today, not someday)
Use this redacted snippet; replace only the UPN line if needed.
Sticking with AzureADPreview is fine when you only need sign-in logs—just remember: PowerShell 5.x, re-query after changing dates, and export only the fields the requester needs.
Pocket I’m Keeping
“Query fresh, then shape.” Most delays come from reusing an old $logs object after changing the date window.
Exchange Online sometimes reports mailbox sizes with “Unlimited” wrappers that break simple math. Today I built a one-liner-friendly PowerShell snippet that returns Used GB, Quota GB, and Available GB—even when EXO wraps values in Unlimited<T>.
Intro
I needed the available mailbox size for [mailbox]@[domain] without exposing tenant internals. The usual TotalItemSize parsing failed because EXO returned Unlimited<ByteQuantifiedSize>. Here’s the redacted approach that works reliably and falls back cleanly.
Notes from {Speaker}
Context: Exchange Online + PowerShell; target was [mailbox]@[domain].
Constraint: TotalItemSize and ProhibitSendQuota show Unlimited wrappers or localized strings.
Goal: Get UsedGB / QuotaGB / AvailableGB with no tenant secrets.
Perspective (direct quotes)
“If it’s Unlimited<T>, ask for .Value—and always guard with IsUnlimited.” “When objects don’t expose bytes, regex the (123,456 bytes) pattern as a fallback.”
Practice (today, not someday)
Use this redacted snippet. It works with Get-EXO* and falls back to classic cmdlets:
EXO’s objects are powerful but quirky. Guarding for IsUnlimited, using .Value.ToBytes(), and keeping a regex fallback turns a flaky one-off into a repeatable tool.
Pocket I’m Keeping
“Parse what’s there, not what you expect.” When APIs return wrapped or localized strings, a small fallback (regex for (#### bytes)) saves the day.
What I Hear Now (direct quotes)
“Measure in bytes, report in GB.” “Handle Unlimited first, then do math.” “One clean object out—every time.”
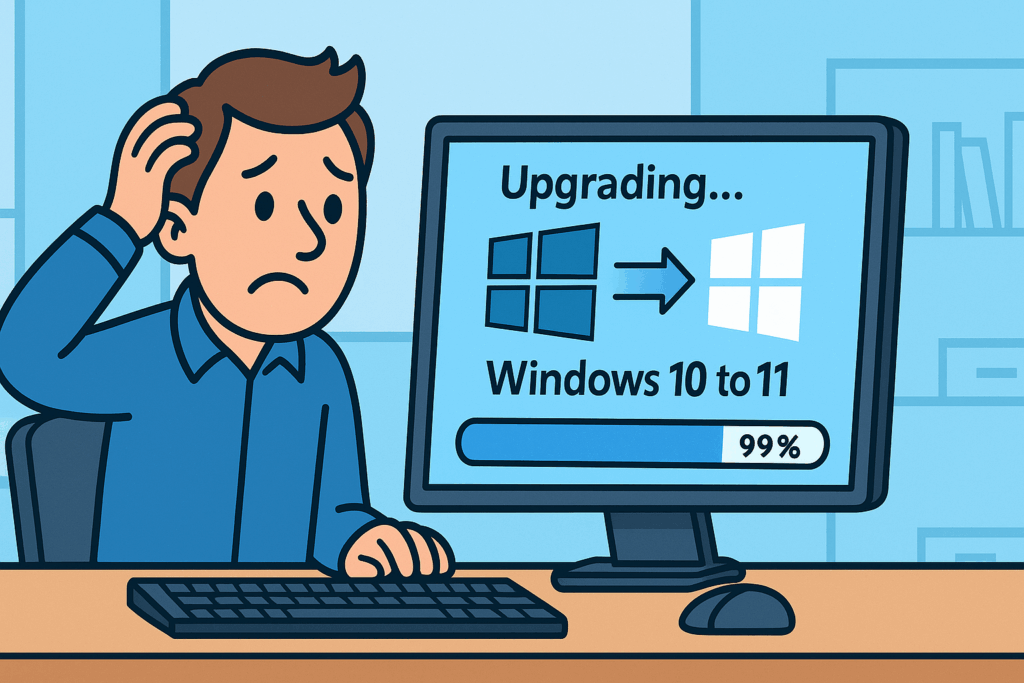
When the upgrade sits at 99%… don’t panic. Go offline and run the ISO upgrade the smart way
Windows 10 reaches end of life on Oct 5, 2025. After that, it won’t get security updates. If you stay on Win10, your machine is a sitting duck for malware and attackers. Don’t procrastinate.
If Windows Update keeps failing—or hangs forever at 99%—use this clean, offline upgrade that skips the flaky “checking for updates” step.
Important: The most common blockers are the CPU and motherboard (TPM 2.0, UEFI/Secure Boot). If your device doesn’t meet Windows 11 requirements, it’s unsupported after Oct 5, 2025. Treat that Windows 10 PC as unsafe for internet use—either upgrade/replace the hardware, reassign it to offline tasks, or retire it.
2) Prep (5–10 minutes)
Unplug non-essential USB devices (drives, printers, docks).
Ensure ≥30 GB free on C:.
Suspend BitLocker (if enabled): Control Panel → BitLocker → Suspend.
When you need to quickly spin up a test or lab machine, cloning an existing VM can save hours compared to building from scratch. VMware PowerCLI brings the full power of vSphere management into PowerShell. Here’s a simple walkthrough.
Pick the source VM, target VM names, host, and datastore. Example:
# Define source VM
$sourceVM = "Base-Win10-VM"

# Clone to new VM
New-VM -Name "Test-VM01" -VM $sourceVM `
       -VMHost (Get-VMHost -Name <target-host>) `
       -Datastore (Get-Datastore -Name <datastore-name>) `
       -Location (Get-Folder -Name "VMs")
-VM points to the existing machine you’re cloning.
-VMHost pins the new VM to a specific ESXi host.
-Datastore chooses where to store the VM’s disks.
-Location defines the vCenter folder for organization.
Step 4 — Power On the New VM
Start-VM -VM "Test-VM01"
Final Reflection
PowerCLI makes cloning fast, repeatable, and scriptable. Instead of clicking through vSphere UI screens, you can prepare test VMs with a single command.
Excerpt Our all-hands list rejected internal senders after we allowed two external addresses. Here’s what happened, how to fix it cleanly in Exchange Online, and a PowerShell snippet you can reuse.
Intro Two days ago, I could email everyone@[redacted].com just fine. Today, my message bounced: “this group only accepts messages from people in its organization or on its allowed senders list.” We’d recently added two partner addresses (s@[partner].com, j@[partner].com) so they could email the DL. That change flipped the DL into strict allow-list mode—blocking even internal senders who weren’t explicitly listed. Here’s the minimal, durable fix.
Straight line (what happened) • Symptom: NDR when sending to everyone@[redacted].com from an internal account. • State check showed: – RequireSenderAuthenticationEnabled: False – AcceptMessagesOnlyFromSendersOrMembers: {} (and earlier, it contained only the two partner GUIDs). • Root cause: Delivery management was saved in “only these senders” mode; membership/ownership doesn’t matter in that state. • Goal: Let all internal, authenticated users send; allow only specific externals; block the rest.
Fix (clean model)
Let internal, authenticated users send to the DL (no hard allow-list on the group).
Enforce external restrictions with a transport rule that allows only the partner exceptions.
Commands (PowerShell — Exchange Online)
Connect
Connect-ExchangeOnline -ShowBanner:$false
Allow internal, authenticated senders (clear hard allow-list)
# add another partner
Set-TransportRule "Block external to Everyone (except allow-list)" `
  -ExceptIfFrom @{Add="newuser@[partner].com"}

# remove a partner
Set-TransportRule "Block external to Everyone (except allow-list)" `
  -ExceptIfFrom @{Remove="j@[partner].com"}
Smoke tests • Internal sender → everyone@[redacted].com: delivers. • External sender (not on list): NDR with “External senders are not allowed…” • Allowed partner (s@[partner].com or j@[partner].com): delivers.
Why not leave the DL in allow-list mode? Because it’s brittle. Every internal sender must be explicitly added, which guarantees future bounces and admin toil. Using RequireSenderAuthenticationEnabled for internal mail + a transport rule for externals gives you clarity and control.
Final reflection Small toggles can have outsized effects. DL delivery settings look simple, but one checkbox can silently change who’s “allowed.” The durable pattern is: authenticate inside, whitelist outside, and verify with a quick trace.
Pocket I’m keeping • Always snapshot DL settings before/after a change. • Prefer transport rules for external policy; don’t hard-gate internals via allow-lists. • Add a ready-to-run “add/remove external exception” snippet to the runbook.
What I hear now Clarity beats cleverness. Make the rule obvious enough that the next admin can read it and know exactly who can send and why.
Excerpt Quick, repeatable way to see CPU/RAM/vSAN headroom across hosts and choose where to place the next VM. Today it pointed us to vsan2.
Intro Before cloning a new Windows VM, I ran a fast PowerCLI sweep across three vSAN hosts to compare free CPU, free memory, and vSAN free space. All three had identical vSAN capacity; vsan2 had the most free RAM, so that’s the landing spot.
Straight line (what I did) • Pulled CPU and memory usage per host (MHz/MB) and calculated free. • Queried each host’s vSAN datastore(s) and summed free/total GB. • Printed a compact table to compare vsan1/2/3 at a glance. • Chose the host with the highest Mem_Free_GB (tie-break on vSAN free).
Result today • vsan2 showed the most free RAM, with CPU headroom similar across all three and identical vSAN free space. • Suggested placement: vsan2.
Pocket I’m keeping • Check host headroom before every clone—30 seconds now saves hours later. • Prefer RAM headroom for Windows VDI/worker VMs; CPU is usually similar across nodes. • Keep a one-liner that prints the table and the suggested host.
What I hear now Clone to vsan2, power up, then let DRS/vMotion rebalance after the build window. Repeat this check whenever adding workloads or after maintenance.
When a partner emailed our all-hands list, they got an NDR: “the group only accepts messages from people in its organization or on its allowed senders list… sender not allowed.”
We’d solved this once before and didn’t capture the steps. This time we did.
the group required authenticated (internal) senders only, and
the external wasn’t on the group’s allowed-senders list
gotcha we hit: New-MailContact failed with ProxyAddressExists — an existing MailUser already owned the external SMTP, so we reused it instead of creating a new contact
Straight line (what fixed it)
identify group by SMTP and check whether it’s a DL or a Microsoft 365 Group
locate the external as an existing MailContact/MailUser (include soft-deleted objects)
add that object to the group’s AcceptMessagesOnlyFromSendersOrMembers list
allow the group to accept external senders (keeps the allow-list in effect)
test and confirm with Message trace
Reusable runbook (PowerShell, redacted)
# 0) Connect
Connect-ExchangeOnline

# 1) Variables (edit these)
$GroupSmtp = "all@[corp-redacted].com"
$ExternalAddresses = @("firstname.lastname@[partner-redacted].com")

# 2) Resolve the group (works for DL or M365 Group)
$grp = Get-EXORecipient -Filter "PrimarySmtpAddress -eq '$GroupSmtp'"
$grp | fl Name,RecipientTypeDetails,PrimarySmtpAddress,Identity,ExternalDirectoryObjectId

# 3) Ensure each external exists as a recipient we can allow (MailContact/MailUser).
#    If already present (or soft-deleted), reuse it.
$recips = @()
foreach ($addr in $ExternalAddresses) {
  $r = Get-EXORecipient -ResultSize Unlimited -IncludeSoftDeletedRecipients `
       -Filter "PrimarySmtpAddress -eq '$addr'"
  if (-not $r) {
    try { New-MailContact -Name $addr -ExternalEmailAddress $addr | Out-Null
          $r = Get-EXORecipient -Filter "PrimarySmtpAddress -eq '$addr'" }
    catch { Write-Host "Contact already exists somewhere: $addr" }
  }
  $recips += $r
}
$recips | ft Name,RecipientTypeDetails,PrimarySmtpAddress -AutoSize

# 4) Add externals to allow-list AND allow external senders
if ($grp.RecipientTypeDetails -eq "GroupMailbox") {
  # Microsoft 365 Group (Unified Group)
  foreach ($r in $recips) {
    Set-UnifiedGroup -Identity $grp.ExternalDirectoryObjectId `
      -AcceptMessagesOnlyFromSendersOrMembers @{Add=$r.Identity}
  }
  Set-UnifiedGroup -Identity $grp.ExternalDirectoryObjectId -AllowExternalSenders:$true
  Get-UnifiedGroup -Identity $grp.ExternalDirectoryObjectId |
    fl DisplayName,PrimarySmtpAddress,AllowExternalSenders,AcceptMessagesOnlyFromSendersOrMembers
} else {
  # Distribution Group / Mail-enabled Security Group
  foreach ($r in $recips) {
    Set-DistributionGroup -Identity $grp.Identity `
      -AcceptMessagesOnlyFromSendersOrMembers @{Add=$r.Identity}
  }
  Set-DistributionGroup -Identity $grp.Identity -RequireSenderAuthenticationEnabled:$false
  Get-DistributionGroup -Identity $grp.Identity |
    fl DisplayName,PrimarySmtpAddress,RequireSenderAuthenticationEnabled,AcceptMessagesOnlyFromSendersOrMembers
}

# 5) Message trace (adjust window)
Get-MessageTrace -SenderAddress $ExternalAddresses[0] -RecipientAddress $GroupSmtp `
  -StartDate (Get-Date).AddHours(-2) -EndDate (Get-Date) |
  ft Received,Status,RecipientAddress,MessageId
Common pitfalls we saw (and how we handled them)
ProxyAddressExists on New-MailContact → an existing MailUser/Contact already holds that SMTP; reuse it (or permanently remove the soft-deleted recipient first).
group can’t be found by display name → target by SMTP with Get-EXORecipient -Filter "PrimarySmtpAddress -eq '...'".
delivery still blocked after allow-list → the DL still required authenticated senders; set RequireSenderAuthenticationEnabled:$false (DL) or AllowExternalSenders:$true (M365 Group).
Click-path (EAC, if you don’t want PowerShell)
Recipients → Contacts → add/find the partner’s contact
Recipients → Groups → open the group → Delivery management → “Accept messages from” → add the contact
For DLs: turn off “Require sender authentication”
For M365 Groups: enable “Allow external senders”
Prevention / hygiene
keep an “Authorized External Senders — all” mail-enabled security group; allow that group on the DL/M365 Group, then just add/remove partner contacts over time
document the NDR verbatim and the message trace ID when you close an incident
Redaction note
All addresses and names are redacted. Replace with your real SMTPs when running the script.
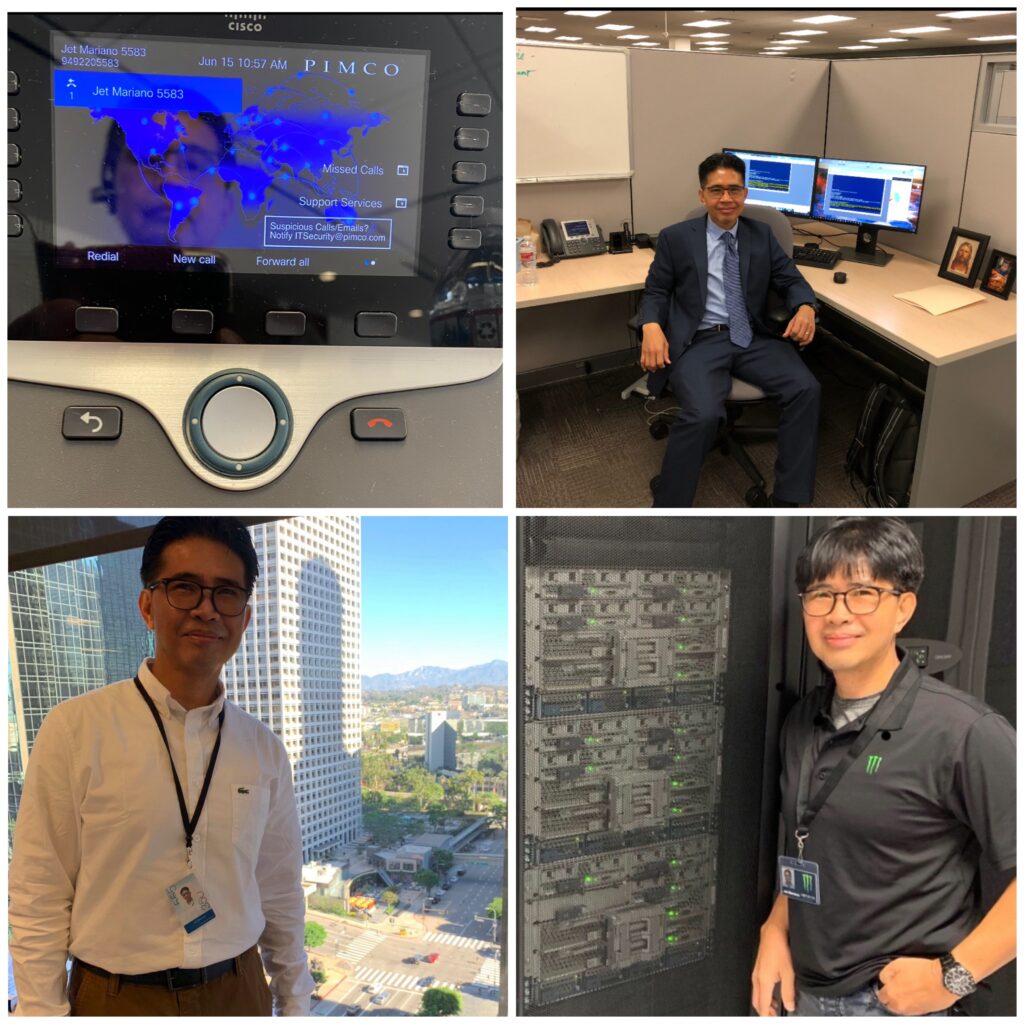
PIMCO (Newport Beach HQ, CA) 🌍 — Global financial services supporting regions in NA, EMEA, APAC. Church (Riverton Office Building, UT) ⛪ — Worldwide infrastructure with 200k employees and over 80k missionaries. Monster Energy (Corona HQ, CA) ⚡ — Global enterprise IT operations across NA, EMEA, APAC. City National Bank (Downtown LA, CA) 🏙️ — U.S. banking systems at scale.
Every IT career tells a story, and mine has moved through three different scales of impact:
Company-Level Foundations → At PayForward, I migrated an entire OnPrem environment into AWS. That meant setting up VPCs, building HA Exchange clusters with load balancers, and proving the power of cloud for a fast-moving startup.
Regional / Global Scale → At Monster Energy and PIMCO, the work stretched across North America, EMEA, and APAC. The systems never slept. VMware clusters and M365 tenants had to function as one, even though users were scattered across time zones and continents.
Worldwide Reach → At the Church, the scale expanded beyond regions. Over 200,000 employees and over 80,000 missionaries, connected by systems that had to reach every corner of the globe, demanded both technical precision and spiritual responsibility.
This journey shows that the “cloud above us” isn’t just AWS, Azure, or GCP — it’s the ability to design, secure, and sustain systems at every possible scale.
A colleague once told me: “Automate, or eliminate.” In IT, that isn’t just a clever saying — it’s survival. At the scale of hundreds or even thousands of VMs, EC2 instances, or mailboxes, doing things manually is not just unrealistic — it’s risky. What automation can finish in under 10 minutes might take days or weeks by hand, and even then would be prone to errors.
That’s why Python, PowerShell, Bash, and automation frameworks became part of my daily toolkit. Not to flaunt, but because without automation, no single engineer could handle the demands of environments as large as PIMCO, Monster Energy, or the Church.
Snippet 1: AWS (My PayForward Days)
import boto3

# Connect to AWS S3
s3 = boto3.client('s3')

# List buckets
buckets = s3.list_buckets()
print("Your AWS buckets:")
for bucket in buckets['Buckets']:
    print(f"  {bucket['Name']}")
From racks of servers to a few lines of Python—that’s the power of AWS.
Snippet 2: PowerShell + Azure (My Church Years, CNB)
One line, and you can see every Azure resource group spread across the world. A task that once required data center visits and clipboards is now just a command away.
Snippet 3: PHP + GCP (Expanding Horizons)
use Google\Cloud\Storage\StorageClient;

$storage = new StorageClient([
    'keyFilePath' => 'my-service-account.json'
]);

$buckets = $storage->buckets();

foreach ($buckets as $bucket) {
    echo $bucket->name() . PHP_EOL;
}
# Connect to vCenter and list VMs across data centers
Connect-VIServer -Server vcenter.global.company.com -User admin -Password pass
Get-VM | Select Name, PowerState, VMHost, Folder

# Quick check of licensed users in M365 (global tenants)
Connect-MgGraph -Scopes "User.Read.All"
Get-MgUser -All -Property DisplayName, UserPrincipalName, UsageLocation |
    Group-Object UsageLocation |
    Select Name, Count
One script, and suddenly you’re seeing footprints of users spread across the globe — NA, EMEA, APAC, or even worldwide. That’s the reality of modern IT infrastructure.
The “cloud above us” is both a literal technology — AWS, Azure, and GCP that I’ve worked across — and a metaphor. It represents resilience, scalability, and unseen support. Just as automation carries workloads we could never handle by hand, life has storms we cannot carry alone.
From startups making their first move to the cloud, to global financial institutions, to worldwide organizations with hundreds of thousands of users, the lesson is the same: we are not meant to fight every battle manually.
We are given tools, teammates, and even unseen strength from above to keep moving forward. The same way a script can manage thousands of servers or accounts without error, trust and preparation help us navigate the storms of life with less fear.
☁️ Above every storm, there’s always a cloud carrying potential. And above that cloud, always light waiting to break through.
Before my cloud journey, I also spent nine years in forensic IT supporting law enforcement — a grounding reminder that technology isn’t only about systems and scale, but about accountability and truth.
Introduction: In enterprise environments, automation is only as secure as the credentials it uses. Hardcoding passwords into scripts is a security disaster waiting to happen. Enter PowerShell SecretManagement — a cross-platform module that allows IT professionals to store, retrieve, and manage credentials securely while keeping scripts clean, compliant, and automation-ready.
Description & Guide:
What is SecretManagement? The SecretManagement module provides a unified way to work with secrets across different vaults like Windows Credential Manager, Azure Key Vault, KeePass, or HashiCorp Vault — without locking you into a single storage provider.
Works seamlessly with CI/CD pipelines and scheduled tasks
Conclusion: Security and automation don’t have to be enemies. With PowerShell SecretManagement, you can protect sensitive credentials without sacrificing automation speed or flexibility. For IT pros managing hybrid environments, this module is a must-have in your PowerShell toolbox.
If you’d like to go beyond this post and see what Microsoft officially recommends, here are my go-to resources: