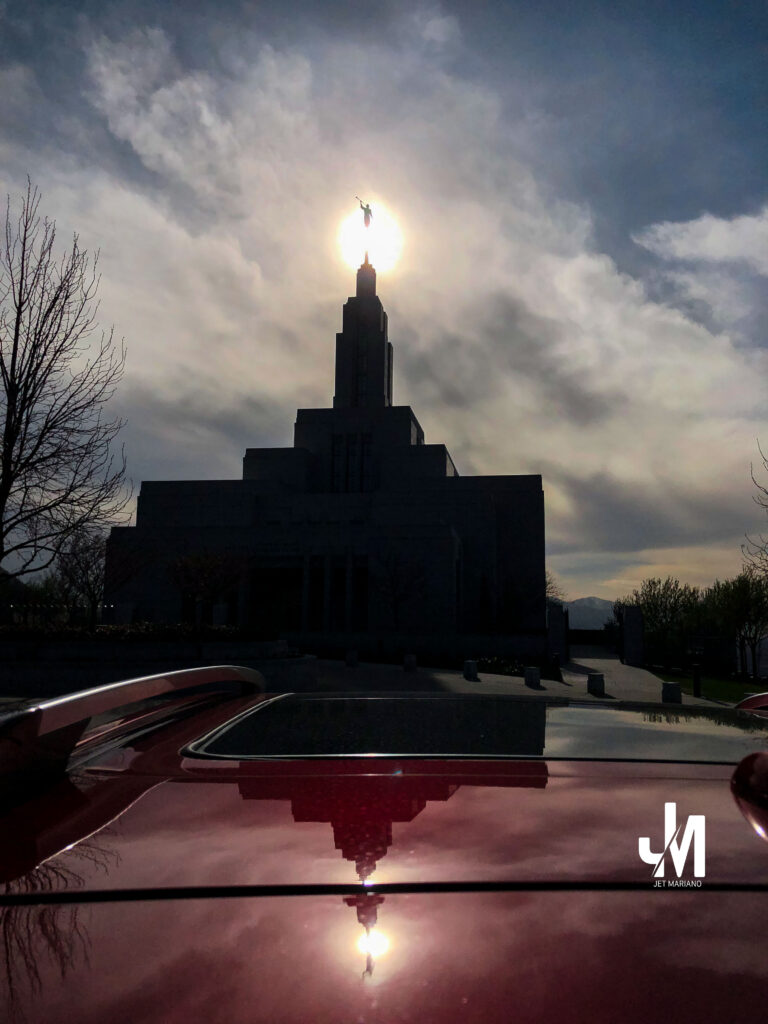
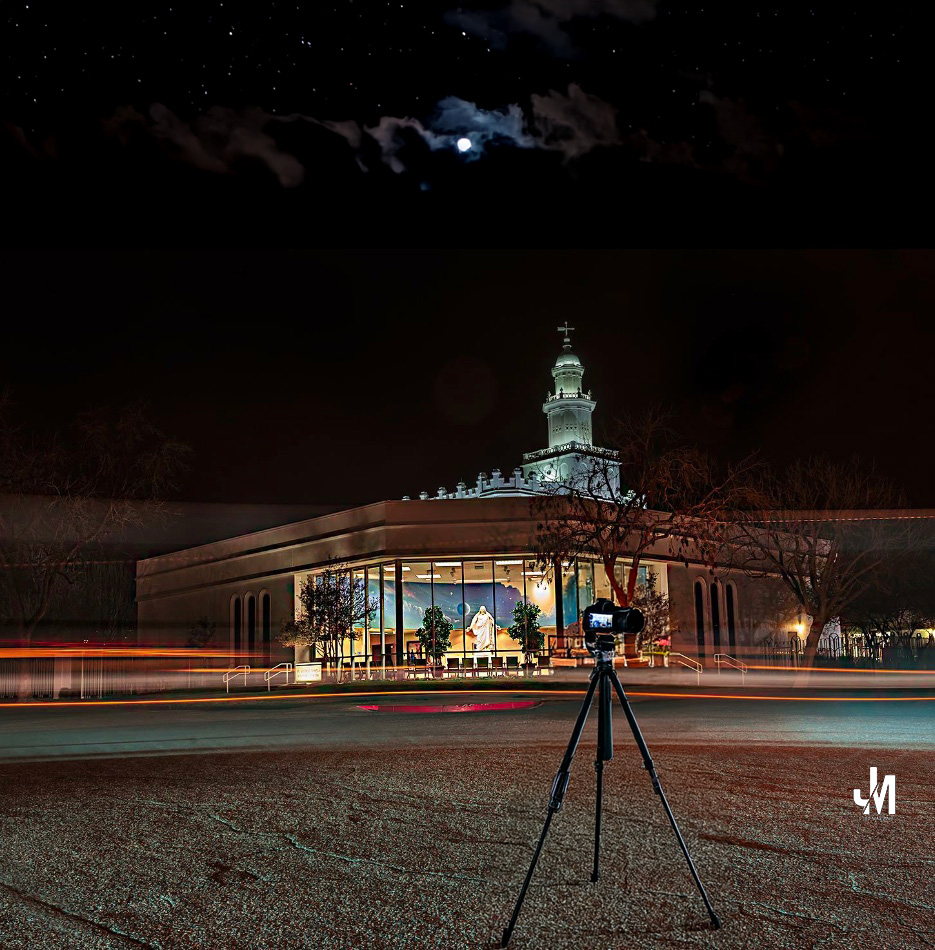
Author: jetnmariano

  • My Daily Fuel: The Disciplines That Drive Me in IT, Health, and Faith – Jet Mariano

    Discipline powers my day—IT mastery, martial arts, and faith. Here’s what fuels my life and helps me stay focused, strong, and grateful.


    🥗 Breakfast Bowl of Champions

    Every morning starts with a bowl like this — loaded with:

    • Blueberries and raspberries (antioxidants and anti-aging)
    • Corn for fiber and flavor
    • Fresh mint and leafy greens to cool and cleanse
    • Just enough healthy fat to keep me going for hours

    This isn’t just a salad. It’s a statement.


    🌿 Wheatgrass Shot With Lemon

    Wheatgrass has been part of my daily detox for years. Combined with lemon, it cleanses the blood, clears the mind, and gives me a sense of internal power. I take it like a sacred ritual — one shot, one breath, and one step closer to balance.


    💬 Final Thought

    People chase diets. I live a lifestyle. What you see here is part of my covenant to care for my body. It’s not about vanity. It’s about staying sharp, calm, and ready — for the people I serve, the work I do, and the God I love.

    © 2012–2025 Jet Mariano. All rights reserved.

    For usage terms, please see the Legal Disclaimer.

  • Health & Fitness: How I Eat Clean, Stay Strong, and Live Long

    At my current age in life, I feel like I’m in my early 30s — full of energy, mentally sharp, and physically strong. That’s no accident. This post shares how I fuel my body, train my mind, and keep my spirit steady. From what I eat to how I move and why I rest, this is the lifestyle that keeps me grateful and grounded.

    ## My Daily Fuel

    ## Strength in Simplicity

    ## Hiking is Healing

    ## Steel & Stillness

    ## Conclusion

  • How I Deployed and Cleaned Up a Windows Server VM in Azure with PowerShell

     The Problem

    After spinning up a few test VMs in Azure, I realized the costs were creeping up from unused resources. Manual cleanup was time-consuming, especially when tracking which NICs, disks, and IPs belonged to what. I needed a faster, cleaner solution—one script to deploy, another to destroy.

     The Solution

    I wrote two PowerShell scripts:

    1. New-AzServerVmRdp-20250509_GitHub.ps1: Fully automates deployment of a Windows Server 2019 VM with RDP access.
    2. Remove-AzServerVmRdp-20250509_GitHub.ps1: Cleans up the entire environment by removing the resource group.

    These scripts not only deploy the VM but configure the VNet, subnet, NSG, public IP, and NIC—all with one command.

     The Code

    Deploy Script:

    New-AzResourceGroup -Name "MyTestRG" -Location "westus"
    # ... other setup commands
    New-AzVM -ResourceGroupName "MyTestRG" -Location "westus" -VM $vmConfig

    Cleanup Script:

    Remove-AzResourceGroup -Name "MyTestRG" -Force -AsJob

     The Result

    I can now spin up a fresh, RDP-ready Windows Server in under 10 minutes and wipe it clean with a single line. I tested the RDP connection, confirmed the VM’s performance, and removed the environment—no residual charges, no clutter.

     🔗 View on GitHub

    © 2012–2025 Jet Mariano. All rights reserved.

    For usage terms, please see the Legal Disclaimer.

  • Deploy & Remove Windows Server VM in Azure via RDP

    Automate the full lifecycle of a Windows Server VM in Azure — from deployment to secure RDP access and safe cleanup — using PowerShell.

    Step-by-Step Process:

    1. Azure Login and Subscription Setup
    Connect-AzAccount
    Set-AzContext -SubscriptionId "<your-subscription-id>"
    

    2. Create Resource Group

    New-AzResourceGroup -Name "MyTestRG" -Location "westus"
    

    3. Create Virtual Network and Subnet

    $subnetConfig = New-AzVirtualNetworkSubnetConfig -Name "MySubnet" -AddressPrefix "10.0.1.0/24"
    $vnet = New-AzVirtualNetwork -Name "MyVNet" -ResourceGroupName "MyTestRG" -Location "westus" -AddressPrefix "10.0.0.0/16" -Subnet $subnetConfig
    

    4. Create Network Security Group with RDP Access

    $rdpRule = New-AzNetworkSecurityRuleConfig -Name "Allow-RDP" -Protocol "Tcp" -Direction "Inbound" -Priority 1000 -SourceAddressPrefix "*" -SourcePortRange "*" -DestinationAddressPrefix "*" -DestinationPortRange 3389 -Access "Allow"
    $nsg = New-AzNetworkSecurityGroup -Name "MyNSG" -ResourceGroupName "MyTestRG" -Location "westus" -SecurityRules $rdpRule
    

    5. Create Public IP Address

    $publicIp = New-AzPublicIpAddress -Name "MyPublicIP" -ResourceGroupName "MyTestRG" -Location "westus" -AllocationMethod Static -Sku Basic
    

    6. Create Network Interface

    $subnet = Get-AzVirtualNetworkSubnetConfig -Name "MySubnet" -VirtualNetwork $vnet
    $nic = New-AzNetworkInterface -Name "MyNIC" -ResourceGroupName "MyTestRG" -Location "westus" -SubnetId $subnet.Id -NetworkSecurityGroupId $nsg.Id -PublicIpAddress $publicIp
    

    7. Enter Credentials

    $cred = Get-Credential  # Use a simple username like 'azureadmin'
    

    8. Configure the Server VM

    $vmConfig = New-AzVMConfig -VMName "MyServerVM" -VMSize "Standard_B1s"
    $vmConfig = Set-AzVMOperatingSystem -VM $vmConfig -Windows -ComputerName "MyServerVM" -Credential $cred
    $vmConfig = Set-AzVMSourceImage -VM $vmConfig -PublisherName "MicrosoftWindowsServer" -Offer "WindowsServer" -Skus "2019-Datacenter" -Version "latest"
    $vmConfig = Add-AzVMNetworkInterface -VM $vmConfig -Id $nic.Id
    

    9. Deploy the Server VM

    New-AzVM -ResourceGroupName "MyTestRG" -Location "westus" -VM $vmConfig
    

    10. Connect via Remote Desktop

    1. Launch Remote Desktop (RDP)
    2. Enter the Public IP of your VM
    3. Click “More choices” > “Use a different account”
    4. Log in with:
      • Username: azureadmin
      • Password: the one you specified
    5. Accept the certificate prompt

    ✅ You’re connected!

    Clean Up: Delete Azure Windows Server VM and Resources to Avoid Charges

    To prevent ongoing charges after testing, it’s important to delete all associated resources, including:

    • The Virtual Machine (MyServerVM)
    • Public IP Address
    • Network Interface (MyNIC)
    • Network Security Group (MyNSG)
    • Virtual Network and Subnet (MyVNet, MySubnet)
    • Managed Disk
    • And any other resource under the resource group

    You can remove all of these at once using the following command:

    Remove-AzResourceGroup -Name "MyTestRG" -Force -AsJob
    

    🔗View on GitHub

    © 2012–2025 Jet Mariano. All rights reserved.

    For usage terms, please see the Legal Disclaimer.

  • Deploy and Clean Up a Windows VM in Azure Using PowerShell

    To provision a Windows 10 virtual machine in Azure, assign it a public IP address, and successfully connect to it via Remote Desktop Protocol (RDP).

    Step-by-Step Process:

    1. Azure Login and Subscription Setup

    Connect-AzAccount
    Set-AzContext -SubscriptionId "<your-subscription-id>"

    2. Create Resource Group

    New-AzResourceGroup -Name "MyTestRG" -Location "westus"

    3. Create Virtual Network and Subnet

    $subnetConfig = New-AzVirtualNetworkSubnetConfig -Name "MySubnet" -AddressPrefix "10.0.1.0/24"
    $vnet = New-AzVirtualNetwork -Name "MyVNet" -ResourceGroupName "MyTestRG" -Location "westus" -AddressPrefix "10.0.0.0/16" -Subnet $subnetConfig

    4. Create Network Security Group with RDP Access

    $rdpRule = New-AzNetworkSecurityRuleConfig -Name "Allow-RDP" -Protocol "Tcp" -Direction "Inbound" -Priority 1000 -SourceAddressPrefix "*" -SourcePortRange "*" -DestinationAddressPrefix "*" -DestinationPortRange 3389 -Access "Allow"
    $nsg = New-AzNetworkSecurityGroup -Name "MyNSG" -ResourceGroupName "MyTestRG" -Location "westus" -SecurityRules $rdpRule

    5. Create Network Interface (NIC)

    $subnet = Get-AzVirtualNetworkSubnetConfig -Name "MySubnet" -VirtualNetwork $vnet
    $nic = New-AzNetworkInterface -Name "MyNIC" -ResourceGroupName "MyTestRG" -Location "westus" -SubnetId $subnet.Id -NetworkSecurityGroupId $nsg.Id

    6. Enter Credentials

    $cred = Get-Credential  # Use a username like: azureadmin and a strong password

    7. Configure the Windows 10 VM

    $vmConfig = New-AzVMConfig -VMName "MyVM" -VMSize "Standard_B1s"
    $vmConfig = Set-AzVMOperatingSystem -VM $vmConfig -Windows -ComputerName "MyVM" -Credential $cred
    $vmConfig = Set-AzVMSourceImage -VM $vmConfig -PublisherName "MicrosoftWindowsDesktop" -Offer "Windows-10" -Skus "win10-22h2-pro" -Version "latest"
    $vmConfig = Add-AzVMNetworkInterface -VM $vmConfig -Id $nic.Id

    8. Deploy the Virtual Machine

    New-AzVM -ResourceGroupName "MyTestRG" -Location "westus" -VM $vmConfig

    9. Create and Attach a Public IP Address

    $publicIp = New-AzPublicIpAddress -Name "MyPublicIP" -ResourceGroupName "MyTestRG" -Location "westus" -AllocationMethod Static -Sku Basic
    $nic = Get-AzNetworkInterface -Name "MyNIC" -ResourceGroupName "MyTestRG"
    $nic.IpConfigurations[0].PublicIpAddress = $publicIp
    Set-AzNetworkInterface -NetworkInterface $nic

    10. Reset VM Admin Credentials (if needed)

    Set-AzVMExtension -ResourceGroupName "MyTestRG" -Location "westus" -VMName "MyVM" -Name "ResetAccess" -Publisher "Microsoft.Compute" -ExtensionType "VMAccessAgent" -TypeHandlerVersion "2.4" -Settings @{ "UserName" = "azureadmin" } -ProtectedSettings @{ "Password" = "YourNewP@ssw0rd!" }

    Final Step: Connect via Remote Desktop

    1. Launch Remote Desktop (RDP)
    2. Enter the Public IP of your VM
    3. Click “More choices” > “Use a different account”
    4. Login as:
      • Username: azureadmin
      • Password: the one you specified
    5. Accept certificate prompt

    You’re now connected! ✅

    Clean Up: Delete Azure VM and Resources to Avoid Charges

    When you’re done testing, it’s important to clean up to avoid being billed for unused resources like disks, NICs, static IPs, and NSGs. You can do that with one simple PowerShell command:

    # Clean up everything in one shot
    Remove-AzResourceGroup -Name "MyTestRG" -Force -AsJob
    

    This command deletes:

    • The Virtual Machine (MyVM)
    • Network Interface (MyNIC)
    • Network Security Group (MyNSG)
    • Virtual Network (MyVNet) and Subnet (MySubnet)
    • Public IP (MyPublicIP)
    • Managed Disks and any attached resources

    📎 View on GitHub

    © 2012–2025 Jet Mariano. All rights reserved.
    For usage terms, please see the Legal Disclaimer.

  • Compact and Defrag Exchange On-Prem Mailbox Database

    This script uses eseutil to perform offline defragmentation and compaction of Exchange mailbox databases, helping reclaim unused space and improve performance.

    # Dismount database
    Dismount-Database -Identity "Mailbox Database 001"
    
    # Defrag the database (adjust path as needed)
    eseutil /d "E:\ExchangeDB\Mailbox Database 001.edb" /t"E:\Temp\DBDefrag.edb"
    
    # Mount database back
    Mount-Database -Identity "Mailbox Database 001"
    

    This script must be run during off-hours. Always take a full backup before running offline defrag.

    🔗 View on GitHub

    © 2012–2025 Jet Mariano. All rights reserved.
    For usage terms, please see the Legal Disclaimer.

  • Assign Permissions to Distribution Group and Linked Shared Mailbox

    This script adds members to an existing Distribution Group and grants them appropriate permissions on a related shared mailbox (like “Send As” and “Full Access”). Useful when a team manages both a DL and its mailbox.

    # Add members to Distribution Group
    $members = @("[email protected]", "[email protected]", "[email protected]")
    foreach ($m in $members) {
        Add-DistributionGroupMember -Identity "Sales Team" -Member $m
    }
    
    # Assign Send As & Full Access to all DG members (loop through)
    foreach ($m in $members) {
        Add-MailboxPermission -Identity "[email protected]" -User $m -AccessRights FullAccess -InheritanceType All
        Add-ADPermission -Identity "Sales Team" -User $m -ExtendedRights "Send As"
    }
    

    Great for use in tightly aligned teams with shared inbox responsibility.

    🔗 View on GitHub

    © 2012–2025 Jet Mariano. All rights reserved.

    For usage terms, please see the Legal Disclaimer.

  • Create Marketing Shared Mailbox with Read, Send As, and Full Access Roles

    This script creates a Marketing shared mailbox and assigns three permission tiers: 10 users with read-only, 10 with “Send As,” and one owner with full access. Great for controlled collaboration environments.

    # Create Shared Mailbox
    New-Mailbox -Name "Marketing Shared" -Shared -PrimarySmtpAddress "[email protected]"
    
    # Assign Read-Only Access (View Only - use mailbox folder permissions)
    $readUsers = @("[email protected]", "[email protected]", "[email protected]")
    foreach ($user in $readUsers) {
        Add-MailboxFolderPermission -Identity "[email protected]:\Inbox" -User $user -AccessRights Reviewer
    }
    
    # Assign Send As permissions
    $sendAsUsers = @("[email protected]", "[email protected]", "[email protected]")
    foreach ($user in $sendAsUsers) {
        Add-ADPermission -Identity "Marketing Shared" -User $user -ExtendedRights "Send As"
    }
    
    # Assign Full Access to Owner
    Add-MailboxPermission -Identity "[email protected]" -User "[email protected]" -AccessRights FullAccess -InheritanceType All
    

    Run this after connecting to Exchange Online. Mailbox folder permissions are used for read-only access.

    🔗 View on GitHub

    © 2012–2025 Jet Mariano. All rights reserved.

    For usage terms, please see the Legal Disclaimer.

  • ChromeEdgeCleaner

    Welcome!
    This utility helps system administrators quickly clear cache, cookies, history, and temp files from both Chrome and Edge using PowerShell—ideal for troubleshooting browser issues or prepping a machine for user handoff.

    Description:
    This script uses file system paths and environment variables to remove temporary internet files, browsing history, and cached data from both Microsoft Edge and Google Chrome. It is especially useful in enterprise environments for periodic cleanup or pre-deployment routines.

    # Clear Chrome browser data
    $chromePaths = @(
        "$env:LOCALAPPDATA\Google\Chrome\User Data\Default\Cache",
        "$env:LOCALAPPDATA\Google\Chrome\User Data\Default\Code Cache",
        "$env:LOCALAPPDATA\Google\Chrome\User Data\Default\Cookies",
        "$env:LOCALAPPDATA\Google\Chrome\User Data\Default\History",
        "$env:LOCALAPPDATA\Google\Chrome\User Data\Default\Temp"
    )
    foreach ($path in $chromePaths) {
        if (Test-Path $path) {
            Remove-Item $path -Recurse -Force -ErrorAction SilentlyContinue
        }
    }
    
    # Clear Edge browser data
    $edgePaths = @(
        "$env:LOCALAPPDATA\Microsoft\Edge\User Data\Default\Cache",
        "$env:LOCALAPPDATA\Microsoft\Edge\User Data\Default\Code Cache",
        "$env:LOCALAPPDATA\Microsoft\Edge\User Data\Default\Cookies",
        "$env:LOCALAPPDATA\Microsoft\Edge\User Data\Default\History",
        "$env:LOCALAPPDATA\Microsoft\Edge\User Data\Default\Temp"
    )
    foreach ($path in $edgePaths) {
        if (Test-Path $path) {
            Remove-Item $path -Recurse -Force -ErrorAction SilentlyContinue
        }
    }
    

    Notes:

    • Best run with administrative privileges.
    • Does not remove saved passwords or extensions.
    • Can be scheduled via Task Scheduler for weekly cleanup.

    🔗 View on GitHub

    © 2012–2025 Jet Mariano. All rights reserved.

    For usage terms, please see the Legal Disclaimer.

  • Distribution Group & Shared Mailbox Permissions

    Welcome:
    This PowerShell module automates the creation of a Distribution Group and assigns shared mailbox permissions in one go. Built for environments like Pimco and Monster where access precision and scale are critical.

    Description:
    Create a Distribution Group with over 20 members, nest a shared mailbox and another DL, and assign permissions like “Send As” and “Full Access” as needed.

    # Create Distribution Group
    New-DistributionGroup -Name "LegalTeamDG" -PrimarySmtpAddress [email protected] -OrganizationalUnit "OU=Groups,DC=domain,DC=com"
    
    # Add users
    $users = @("[email protected]", "[email protected]", ..., "[email protected]")
    foreach ($user in $users) {
        Add-DistributionGroupMember -Identity "LegalTeamDG" -Member $user
    }
    
    # Nest a Shared Mailbox and DL
    Add-DistributionGroupMember -Identity "LegalTeamDG" -Member "[email protected]"
    Add-DistributionGroupMember -Identity "LegalTeamDG" -Member "[email protected]"
    
    # Assign Send As and Full Access
    Add-RecipientPermission -Identity "[email protected]" -Trustee "LegalTeamDG" -AccessRights SendAs -Confirm:$false
    Add-MailboxPermission -Identity "[email protected]" -User "LegalTeamDG" -AccessRights FullAccess -InheritanceType All
    

    Replace placeholder values with actual names and domains.

    Requires Exchange Online PowerShell module.

    Add DLs with caution—permissions are inherited recursively.

    🔗 View on GitHub

    © 2012–2025 Jet Mariano. All rights reserved.

    For usage terms, please see the Legal Disclaimer.

  • Dynamic Distribution List Generator (PowerShell)

    Description:
    This script automates the creation of Dynamic Distribution Groups based on user attributes (e.g., department, title, or office) and applies filters to populate the group membership dynamically.

    # Connect to Exchange Online (Modern Auth)
    Connect-ExchangeOnline -UserPrincipalName [email protected]
    
    # Define variables
    $DLName = "DL-SLC-IT"
    $RecipientFilter = "(Department -eq 'IT') -and (Office -eq 'Salt Lake City')"
    
    # Create the Dynamic Distribution Group
    New-DynamicDistributionGroup -Name $DLName -RecipientFilter $RecipientFilter
    
    # Confirm creation
    Get-DynamicDistributionGroup -Identity $DLName | Format-List Name,RecipientFilter
    
    • Customize $DLName and $RecipientFilter as needed for your organization.
    • This script assumes you have Exchange Online PowerShell V2 module installed.
    • Optional: Add -PrimarySmtpAddress or -DisplayName if you want a specific email format.

    Dynamic DL Generator

    Easily generate dynamic distribution lists in Exchange Online using custom filters and automated membership rules. Ideal for modern, policy-based email groups.

    🔗 View on GitHub

    © 2012–2025 Jet Mariano. All rights reserved.

    For usage terms, please see the Legal Disclaimer.

  • License & Group Audit

    Shine a light on your Microsoft 365 usage.
    This tool provides a snapshot of license assignments and group memberships—perfect for cleanup, budgeting, and security reviews.

    Description:
    Quickly audit Microsoft 365 user licenses and group memberships to spot inconsistencies and optimize provisioning.

    # Connect to Microsoft Graph
    Connect-MgGraph -Scopes "User.Read.All", "Directory.Read.All"
    
    # Get all licensed users
    $users = Get-MgUser -All | Where-Object { $_.AssignedLicenses }
    
    foreach ($user in $users) {
        $groups = Get-MgUserMemberOf -UserId $user.Id
        [PSCustomObject]@{
            DisplayName   = $user.DisplayName
            UserPrincipal = $user.UserPrincipalName
            Licenses      = ($user.AssignedLicenses | ForEach-Object { $_.SkuId }) -join ', '
            Groups        = ($groups | Where-Object { $_.'@odata.type' -eq '#microsoft.graph.group' } | ForEach-Object { $_.DisplayName }) -join ', '
        }
    }
    

    Requires Microsoft Graph PowerShell SDK.

    Replace SkuId with readable license names by mapping GUIDs if needed.

    Ideal for license audits and ensuring users belong to correct security or M365 groups.

    🔗 View on GitHub

    © 2012–2025 Jet Mariano. All rights reserved.

    For usage terms, please see the Legal Disclaimer.

  • Shared Mailbox Access Report

    Instantly audit who has access to what.
    This report gives you a clear view of shared mailbox permissions across your tenant—crucial for security, compliance, and peace of mind.

    Description:
    Generate a report listing all users with Full Access to shared mailboxes. Perfect for security audits and handoff reviews.

    # Connect to Exchange Online
    Connect-ExchangeOnline -UserPrincipalName [email protected]
    
    # Get all shared mailboxes and their access permissions
    $sharedMailboxes = Get-Mailbox -RecipientTypeDetails SharedMailbox -ResultSize Unlimited
    
    foreach ($mbx in $sharedMailboxes) {
        Get-MailboxPermission -Identity $mbx.Alias |
        Where-Object { $_.AccessRights -like "*FullAccess*" -and $_.User -notlike "NT AUTHORITY*" } |
        Select-Object @{Name="SharedMailbox";Expression={$mbx.DisplayName}},
                      @{Name="User";Expression={$_.User}},
                      AccessRights
    }
    

    Filters out system accounts like NT AUTHORITY\SYSTEM.

    Modify the AccessRights filter if you need SendAs or SendOnBehalf reporting.

    Great for auditing or onboarding/offboarding reviews.

    Shared Mailbox Access Report

    Generate a detailed report showing who has access to each shared mailbox in Exchange Online. Essential for security reviews and access audits.

    🔗 View on GitHub

    © 2012–2025 Jet Mariano. All rights reserved.

    For usage terms, please see the Legal Disclaimer.

  • Mailbox Migration Utility

    Seamlessly migrate mailboxes between servers or tenants with minimal downtime.
    This tool automates batch migrations, preserves permissions, and logs progress — built for smooth transitions in hybrid and cloud environments.

    Description:
    Migrate batches of mailboxes to Exchange Online with minimal effort. Ideal for hybrid setups or post-merger transitions.

    # Connect to Exchange Online and Exchange On-Prem
    Connect-ExchangeOnline -UserPrincipalName [email protected]
    $Session = New-PSSession -ConfigurationName Microsoft.Exchange `
      -ConnectionUri http://onprem.exchange.local/PowerShell/ `
      -Authentication Kerberos
    Import-PSSession $Session -DisableNameChecking
    
    # Create Migration Batch
    New-MigrationBatch -Name "Marketing_Migration" `
      -CSVData ([System.IO.File]::ReadAllBytes("C:\Scripts\marketing.csv")) `
      -TargetDeliveryDomain "domain.mail.onmicrosoft.com" `
      -AutoStart -AutoComplete
    
    EmailAddress
    [email protected]
    [email protected]
    [email protected]
    
    • Make sure your on-prem Exchange supports remote PowerShell.
    • Run Complete-MigrationBatch if -AutoComplete is not used.
    • This utility supports staged, cutover, or remote migrations.

    Mailbox Migration Utility

    Automate mailbox migrations from on-prem to Exchange Online with detailed logging and status checks. A time-saving tool for hybrid environments.

    🔗 View on GitHub

    © 2012–2025 Jet Mariano. All rights reserved.

    For usage terms, please see the Legal Disclaimer.

  • Bulk Out of Office Scheduler

    Schedule and manage auto-replies for multiple users at once — perfect for company-wide holidays or department leaves.
    This PowerShell tool updates internal and external messages in bulk, saving time and reducing manual errors.

    Description:
    Schedule automatic out-of-office replies for multiple users in one go. Useful for holidays, company events, or terminations.

    # Connect to Exchange Online
    Connect-ExchangeOnline -UserPrincipalName [email protected]
    
    # Import CSV of users with their messages and date range
    $Users = Import-Csv "C:\Scripts\outofoffice.csv"
    
    foreach ($user in $Users) {
        Set-MailboxAutoReplyConfiguration -Identity $user.UserPrincipalName `
            -AutoReplyState Scheduled `
            -StartTime $user.StartTime `
            -EndTime $user.EndTime `
            -InternalMessage $user.InternalMessage `
            -ExternalMessage $user.ExternalMessage
    }
    
    UserPrincipalName,StartTime,EndTime,InternalMessage,ExternalMessage
    [email protected],5/6/2025 08:00,5/10/2025 17:00,"I'm out of the office.","Thank you for reaching out. I’ll respond after my return."
    

    Make sure date/time format matches your system locale.

    You can adjust messages per user or use static content.

    Useful for managing departments, terminated accounts, or planned leaves.

    Bulk Out of Office Scheduler
    🔗 View on GitHub

    © 2012–2025 Jet Mariano. All rights reserved.

    For usage terms, please see the Legal Disclaimer.

  • The Price of Earning Respect in IT: What They Don’t Tell You

    📜 The Price of Gaining Respect in the IT World

    By Jet Mariano


    Respect in IT isn’t handed out with certifications, job titles, or seniority. It’s earned — quietly, repeatedly — through solutions delivered under pressure, systems recovered when no one else could, and long hours spent automating what others assumed had to be manual.

    I’ve restored failed VMs when the backups looked hopeless.
    I’ve rebalanced VMware clusters to keep production workloads running efficiently.
    I’ve automated daily cloud operations across Azure — from onboarding to Defender alert responses — reducing hours of repetitive tasks into seconds of silent execution.

    In one instance, proactive Azure Defender tuning flagged behavior that could have led to a ransomware attack. No one ever knew how close it came — and that’s the point. The better your work, the less noise it makes.

    I’ve diagnosed why provision-on-demand failed in a live CTS environment, traced financial VM crashes back to Veeam I/O timing conflicts, and implemented site-to-site VPN connections that quietly brought entire departments online again.

    No one claps for any of it.
    No one sees the nights spent scripting, or the documentation created while others sleep.

    But that’s where respect lives in IT —
    Not in applause, but in quiet confidence.
    Not in recognition, but in results.

    You don’t demand respect in this field.
    You build it.

    One restored environment at a time.
    One secure connection at a time.
    One automated fix before someone even files the ticket.


    🔥 Final Thought:

    If you’re still working toward that respect —
    Don’t force it.
    Deliver, document, and repeat.

    Sooner or later, your work will do all the talking.

    🛡️

    © 2012–2025 Jet Mariano. All rights reserved.
    For usage terms, please see the Legal Disclaimer.

  • Migrating Devices from On-Prem Active Directory to Azure AD: A Step-by-Step Guide

    📋 Preparation Checklist:

    • Administrator Access:
      Ensure you have local administrator privileges on the device and permissions to join devices to your Azure AD tenant.
    • Backup Tools:
      Prepare external storage or a secure share for temporary backup of user data.

    🛠️ Step-by-Step Migration Process:

    1. Backup User Data

    Before making any changes to domain membership, back up critical user data:

    • Folders: Documents, Desktop, Downloads, Pictures
    • Browser Favorites and Passwords:
      Export bookmarks from Chrome, Edge, or Firefox.
      Backup or sync saved passwords if available.
    • Mapped Drives and Group Shares:
      Document connections if needed for re-mapping after migration.

    2. Disjoin Device from On-Premises Domain

    • Navigate to Settings > System > About > Domain or Workgroup settings.
    • Choose to Disconnect from the domain.
    • When prompted, join a Workgroup (e.g., WORKGROUP).
    • Important:
      Ensure you know the local administrator credentials before disjoining.

    Restart the device after disjoining.


    3. Join Device to Azure AD

    ✅ Two methods:

    GUI Method (Recommended):

    • Open Settings > Accounts > Access Work or School > Connect.
    • Select Join this device to Azure Active Directory.
    • Enter the user’s Azure AD email address and password.

    PowerShell Method (Optional for Advanced Users):

    powershellCopyEditdsregcmd /join
    

    (Additional setup like authentication context may apply.)

    Restart the device after joining.


    4. Confirm Azure AD Join Success

    Open PowerShell and run:

    powershellCopyEditdsregcmd /status
    

    ✅ Look for:

    • AzureAdJoined : YES
    • DomainJoined : NO (expected after leaving on-premises domain)

    5. Restore User Data

    • Copy back Documents, Desktop, Downloads, and Pictures.
    • Restore browser favorites and re-import saved passwords.
    • Reconnect mapped drives, printers, or any network-based resources.

    6. User Login

    The user can now log in using their Azure AD email address and password.

    ✅ If Multi-Factor Authentication (MFA) is enabled, users should complete MFA registration during first login.


    7. Final Configuration

    • Verify mapped network drives.
    • Ensure printer connections are restored.
    • Test access to any business-critical applications.
    • Confirm OneDrive sync settings if applicable.

    🧠 Important Tips:

    • Double-check BitLocker status. If BitLocker is enabled, back up recovery keys before starting.
    • Some applications (like SolidWorks or AutoCAD) may require license reactivation post-migration.
    • Communicate expected login changes to users ahead of time to minimize confusion.

    🌟 Conclusion:

    Migrating from on-premises Active Directory to Azure AD doesn’t have to be stressful.
    With careful preparation — backing up data, ensuring admin access, and confirming every step — you can move endpoints securely and efficiently into the modern cloud ecosystem.

    Taking the time to handle each stage methodically ensures a smooth experience for both the IT team and end users alike.

    Stay ready. Stay secure. 🛡️

    © 2012–2025 Jet Mariano. All rights reserved.
    For usage terms, please see the Legal Disclaimer.

  • Building Strength for Any Opportunity: Five Pillars to Prepare Yourself

    In today’s fast-moving world, opportunities can appear when we least expect them.
    Whether it’s a job opening, a new project, or a chance to lead, how we prepare determines how we rise.

    Here are five key pillars to help anyone stay ready, resilient, and confident:


    🧠 1. Build a Clear Self-Story

    When opportunities come, be ready to introduce yourself with calm clarity.

    Focus on:

    • Who you are
    • What you specialize in
    • What unique value you bring
    • Why you’re passionate about growing and contributing

    Knowing your story strengthens your voice — and your direction.


    🛡️ 2. Think in Pillars, Not Panic

    When facing challenges (whether designing a system, a business, or a solution), anchor yourself on these five pillars:

    • Scalability — Can this grow without breaking?
    • Security — Is it protected from threats?
    • Availability — Will it stay reliable under pressure?
    • Monitoring — Can I see when things go wrong?
    • Recovery — Can I bring it back if disaster strikes?

    No matter the project or problem, thinking in pillars brings focus and confidence.


    🛠️ 3. Automate and Secure What You Build

    Whatever you create — systems, habits, workflows — build them with automation and security in mind.

    • Script and standardize repeatable steps.
    • Protect secrets and sensitive information.
    • Monitor what you’ve built so it stays healthy.

    Success isn’t just about starting strong — it’s about sustaining strength through discipline.


    ✍️ 4. Turn Mistakes into Upgrades

    Mistakes aren’t failures — they’re training.

    When things go wrong:

    • Stay calm.
    • Own the problem.
    • Fix it thoughtfully.
    • Strengthen the system so it doesn’t happen again.

    Each mistake, if treated right, becomes a foundation stone for bigger resilience.


    🔥 5. Lead with Calm Power

    Before stepping into any new opportunity, remind yourself:

    “I’m not seeking approval.
    I’m offering protection, innovation, and stability to the right people.”

    Confidence isn’t noise — it’s calm clarity.
    You don’t need to push yourself forward — your strength will naturally pull the right opportunities to you.


    🌟 Final Thought:

    Opportunity doesn’t knock when we beg for it.
    It finds those who are quietly building, strengthening, and preparing every day.

    Stay ready. Stay strong. Stay you. 🛡️

    Written by Jet Mariano
    Systems Engineer | Cloud Security Specialist | Creator of jetmariano.us

    © 2012–2025 Jet Mariano. All rights reserved.
    For usage terms, please see the Legal Disclaimer.

  • Cross-Tenant Synchronization (CTS) Setup Using PowerShell: Secure Collaboration Made Easy

    Introduction

    Cross-Tenant Synchronization (CTS) enables organizations to securely synchronize user identities between Azure Active Directory (Entra ID) tenants. While CTS can be configured through the Azure Portal, leveraging PowerShell allows for faster, repeatable, and error-free deployments.

    In this guide, you’ll learn how to set up CTS entirely through PowerShell, ensuring efficient collaboration across multiple cloud environments.


    Why Use PowerShell for CTS?

    • ✅ Automate configuration steps and reduce human error.
    • ✅ Create templates for rapid onboarding of future partner tenants.
    • ✅ Maintain an audit trail of your cross-tenant setup actions.

    Whether you’re managing a single trusted partner or multiple tenants in a complex hybrid environment, PowerShell provides unmatched precision and speed.


    Prerequisites

    • Global Administrator or Directory Administrator permissions in your tenant.
    • Microsoft Graph PowerShell SDK installed (Install-Module Microsoft.Graph -Scope CurrentUser)
    • Appropriate Graph API permissions:
      • Directory.ReadWrite.All
      • Policy.ReadWrite.CrossTenantAccess
      • User.ReadWrite.All

    Step 1: Connect to Microsoft Graph

    Connect-MgGraph -Scopes "Directory.ReadWrite.All", "User.ReadWrite.All", "Policy.ReadWrite.CrossTenantAccess"

    Step 2: Add the External Organization to Cross-Tenant Access Policy

    New-MgCrossTenantAccessPolicyConfigurationPartner `
      -TenantId "<External-Tenant-ID>" `
      -InboundAccess @{ B2bCollaborationInbound = @{ IsEnabled = $true; Policy = @{ CollaborationRestrictions = "AllowAll" }}} `
      -OutboundAccess @{ B2bCollaborationOutbound = @{ IsEnabled = $true; Policy = @{ CollaborationRestrictions = "AllowAll" }}} `
      -InboundTrust @{ IsMfaAccepted = $true; IsCompliantDeviceAccepted = $false; IsHybridAzureADJoinedDeviceAccepted = $false }

    Important: MFA must be cloud-based (Authenticator App, FIDO keys). Phone/SMS MFA will cause provisioning failures.


    Step 3: Create Cross-Tenant Synchronization Configuration

    New-MgCrossTenantSynchronizationConfiguration `
      -DisplayName "CTS External Tenant Sync" `
      -TenantId "<External-Tenant-ID>" `
      -SynchronizationJob @{
          SynchronizationRules = @(
              @{
                  SourceObjectType = "User"
                  TargetObjectType = "User"
                  Scope = @{ Query = "userType eq 'Member'" }
                  Actions = @(
                      @{ ActionType = "Create" },
                      @{ ActionType = "Update" }
                  )
              }
          )
      }

    Step 4: (Optional) Trigger Provisioning on Demand

    Invoke-MgCrossTenantSynchronizationUserProvisioning `
      -PartnerTenantId "<External-Tenant-ID>" `
      -UserId "<User-Object-ID>"

    This step is helpful for immediate validation after setting up CTS policies.


    Best Practices

    • Validate MFA methods before starting provisioning.
    • Use Conditional Access policies to protect external identities.
    • Start with a small test user group before bulk synchronization.
    • Regularly audit synchronization logs.

    Conclusion

    PowerShell unlocks the full potential of Cross-Tenant Synchronization by making deployments faster, scalable, and easier to audit. By following this approach, you ensure that trusted collaboration between organizations remains secure, compliant, and future-ready.

    Implement CTS with confidence — and take control of your hybrid collaboration strategy.


    Next Step:
    If you’re new to Cross-Tenant Synchronization, start here first: Cross-Tenant Synchronization (CTS) Explained

    © 2012–2025 Jet Mariano. All rights reserved.
    For usage terms, please see the Legal Disclaimer.

  • Cross-Tenant Synchronization (CTS) with Azure B2B Collaboration and PowerShell

    Introduction

    Cross-Tenant Synchronization (CTS) allows organizations to securely sync users across Azure Active Directory (Azure AD) tenants for seamless B2B collaboration. Instead of manually managing external identities, CTS automates identity sharing, reduces administrative burden, and strengthens security.

    In this guide, we’ll cover what CTS is, why it matters, and how you can configure it using real-world PowerShell examples.


    What is Cross-Tenant Synchronization (CTS)?

    CTS enables organizations to automatically create and manage B2B collaboration users across tenants, ensuring updated identities and permissions without manual intervention. It facilitates external collaboration without compromising compliance or security.


    Why Use CTS for B2B Collaboration?

    • Secure Identity Sharing: Automates user onboarding and offboarding between organizations.
    • Unified Collaboration: Enables external users to access Teams, SharePoint, and other Microsoft 365 services.
    • Simplified Management: Reduces manual directory maintenance and ensures identities stay updated.
    • Compliance: Supports MFA and Conditional Access for external users.

    High-Level Setup Steps for CTS

    1. Establish a trust relationship between the source and target Azure AD tenants.
    2. Define synchronization rules for user attributes.
    3. Configure B2B Collaboration settings.
    4. Automate and manage policies with PowerShell.

    PowerShell Sample: Setting Up B2B Trust

    # Step 1: Connect to Azure AD
    Connect-AzureAD
    
    # Step 2: Create a basic B2B Invitation Policy
    New-AzureADPolicy \
      -Definition @('{"B2BInvitation": {"Enabled": true}}') \
      -DisplayName "CTS B2B Collaboration Policy" \
      -Type "B2BInvitationPolicy"
    
    # Step 3: Set Cross-Tenant Access Policy for External Collaboration
    Connect-MgGraph -Scopes "Policy.ReadWrite.CrossTenantAccess"
    
    $policy = @{
        inboundTrust = @{ isMfaAccepted = $true; isCompliantDeviceAccepted = $true }
        outboundTrust = @{ isMfaAccepted = $true; isCompliantDeviceAccepted = $true }
    }
    
    Update-MgPolicyCrossTenantAccessPolicy -BodyParameter $policy

    Best Practices for Cross-Tenant Synchronization

    • Enforce MFA: Require multi-factor authentication for all external users.
    • Use Conditional Access: Protect sensitive apps and data.
    • Attribute Filtering: Only sync necessary user attributes.
    • Separation of Admin Rights: Do not grant external users privileged roles.
    • Audit and Monitor: Regularly review cross-tenant policies and access logs.

    Conclusion

    Cross-Tenant Synchronization (CTS) streamlines external collaboration without sacrificing security. Whether you’re preparing for mergers, managing strategic partnerships, or extending services to external clients, automating CTS setup using PowerShell ensures scalability, consistency, and security.

    Implement CTS today and strengthen your organization’s B2B collaboration foundation.


    Related: See my PowerShell Toolbox for essential automation scripts.

    © 2012–2025 Jet Mariano. All rights reserved.
    For usage terms, please see the Legal Disclaimer.

error: Content is protected !!